Tutorial: drawing a scatterplot using paper.js
Although D3 is very useful for, well, data-driven documents, it’s a bit more difficult to create custom visuals in it; Processing is an easier tool for this. Unfortunately, Processing is java-based (yes, we know about processingjs) so we’ve been looking into other javascript visualization libraries as well that allow for more “creative” coding.
One particular interesting option is paper.js. Here’s a quick tutorial on how to get started with paper.js. We’ll first install it, and let it create a scatterplot based on a CSV file containing the Fisher iris data. For the purpose of this howto, this file should have the following format:
sepalLength,sepalWidth,petalLength,petalWidth,species
5.1,3.5,1.4,0.2,Iris-setosa
4.9,3.0,1.4,0.2,Iris-setosa
4.7,3.2,1.3,0.2,Iris-setosa
4.6,3.1,1.5,0.2,Iris-setosa
5.0,3.6,1.4,0.2,Iris-setosa
5.4,3.9,1.7,0.4,Iris-setosa
4.6,3.4,1.4,0.3,Iris-setosa
...
Installation
To get things started:
- Create a new directory for your project and move into it
bower initbower install papaparse --savebower install jquery --savebower install paper --save- Create an
index.htmlfile that looks like this:
<canvas id="myCanvas" resize></canvas>In lines 4 to 6, we load the necessary libraries: paper for paper.js, papaparse for parsing a CSV file, and jquery for getting that file in the first place. In line 8 we load the javascript file with the actual visualization, putting it on a canvas called myCanvas. In line 12, finally, we actually draw onto that canvas.
The paper.js code
Here’s what the fisher.js file looks like:
The bare minimum
var colors = {'Iris-setosa': '#7fc97f','Iris-versicolor':'#beaed4','Iris-virginica':'#fdc086'}
var csvfile = "data.csv"

view.viewSize = new Size(1200,1200)

$.get(csvfile, function(data,error) {
  var csvdata = Papa.parse(data, {delimiter:',',header:true,dynamicTyping:true})
  csvdata.data.forEach(function(d) {
    new Path.Circle({
      center: [d.sepalLength*50, d.sepalWidth*50],
      radius: 3,
      fillColor: colors[d.species],
      opacity: 0.5
    })
  })
  view.update()
})
On lines 1 and 2 we define some general variables: data.csv is the name of the file containing all data, and we’ll use the colors object to give each flower species its own colour. On line 4 we set the size of the canvas. Make sure to make this big enough, otherwise you’ll be drawing outside of the canvas, which results in an empty picture. Speaking from experience: it can be difficult to find that out…
Line 6 actually loads the file, which is parsed on line 7. All columns in the CSV file are normally treated as strings, but dynamicTyping conveniently converts anything that looks like a number to numbers. In lines 8 to 15 we will draw a circle for every single line in the CSV file. For each circle we have to define its center, radius and fill colour. You’ll notice that I’ve multiplied the sepalLength and sepalWidth values with 50. This is just so that they are separated nicely on the screen. Normally you’d make this depend on the scale of the picture. You’ll also notice that you can refer to each column by calling it as a method on the d object, e.g. d.sepalLength and d.species. Finally, in line 16 we update the graphic.
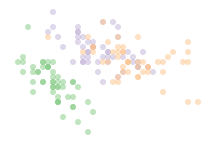
This code gives you a little picture like this:
Running everything
To run this, start a webserver in the directory with this code, for example python -m SimpleHTTPServer and go to http://localhost:8000.
Adding hovering
Let’s add some simple hovering functionality to this plot: if you hover over a point it should be painted red, and return to its original colour again afterwards. For this to happen we have to add an onMouseEnter and onMouseLeave callback to the circles.
var colors = {'Iris-setosa': '#7fc97f','Iris-versicolor':'#beaed4','Iris-virginica':'#fdc086'}
var csvfile = "data.csv"

view.viewSize = new Size(1200,1200)

$.get(csvfile, function(data,error) {
  var csvdata = Papa.parse(data, {delimiter:',',header:true,dynamicTyping:true})
  csvdata.data.forEach(function(d) {
    var color = colors[d.species]
    var circle = new Path.Circle({
      center: [d.sepalLength*50, d.sepalWidth*50],
      radius: 3,
      fillColor: color,
      opacity: 0.5
    })
    circle.onMouseEnter = function() {
      this.fillColor = 'red'
      this.opacity = 1
    }
    circle.onMouseLeave = function() {
      this.fillColor = color
      this.opacity = 0.5
    }
  })
  view.update()
})
We had to make a couple of small changes here. First of all, we put the circle into a variable called circle (line 10) so that we can refer back to it for the onMouseEnter and onMouseLeave callbacks. onMouseEnter gets called whenever your mouse enters the circle, and onMouseLeave when it leaves (obviously…). Secondly, we have to put the colour for each particular circle into a variable (line 9) because we need to use it both in the definition of the circle itself (line 13) and in the onMouseLeave callback in line 21. And obviously we have to define the two callbacks themselves as well on lines 16 to 19, and lines 20 to 23.