How to run an online exercise session
Not being allowed to teach face-to-face at university in these COVID-19 times, we are resorting to online tools like Google Hangouts, Zoom, Blackboard Collaborate and others. Each of these has their pros and cons, but I don’t intend this post to be a full review of these different tools. Let’s just mention that they’re not an ideal fit to what we want.
Online exercise sessions != online lectures
Running exercise sessions instead of regular teaching adds additional constraints on the type of tool that we can use. In a normal face-to-face setting, students will all work on their own while the teachings assistants and I walk around. Although students will typically raise their hands if they are stuck with an exercise, some are more active in asking questions than others and we always have quick glances at their screens to see how they’re coping. When someone is stuck, we’ll look deeper into what they’re doing and provide one-on-one feedback.
Specific requirements
Given the above, we have some additional requirements for teleconferencing tools:
- We should be able to see everyone’s screen. (Most teleconferencing tools do not allow everyone sharing their screen simultaneously.)
- We should be able to speak with one or two students separately. (In most teleconferencing tools, whenever you want to say something goes to all participants.)
- Students should be able to catch our attention. (In most teleconferencing tools you can only do that by either starting to talk or chatting.)
- This should work for our group of 30-40 students.
A possible setup and workflow
After some very brief testing, we have come up with a possible workflow. The tools that we will use:

- jitsi: a multi-platform open source video conferencing tool (which was recommended by a student)
- Google sheets
Why jitsi?
- It allows for everyone to share their screen at once, so that we can “look over the shoulder” of our students as they are working, just like we’d do during an in-person session.
- The procedure to connect to a meeting is very lightweight, which is necessary in the workflow that I’ll explain below.
- As it’s open source, it can - if necessary - be installed locally on a university server so that we have complete control.
This is what jitsi looks like:
Our exercise session workflow
What we need:
- several jitsi sessions: one general one, and one per TA
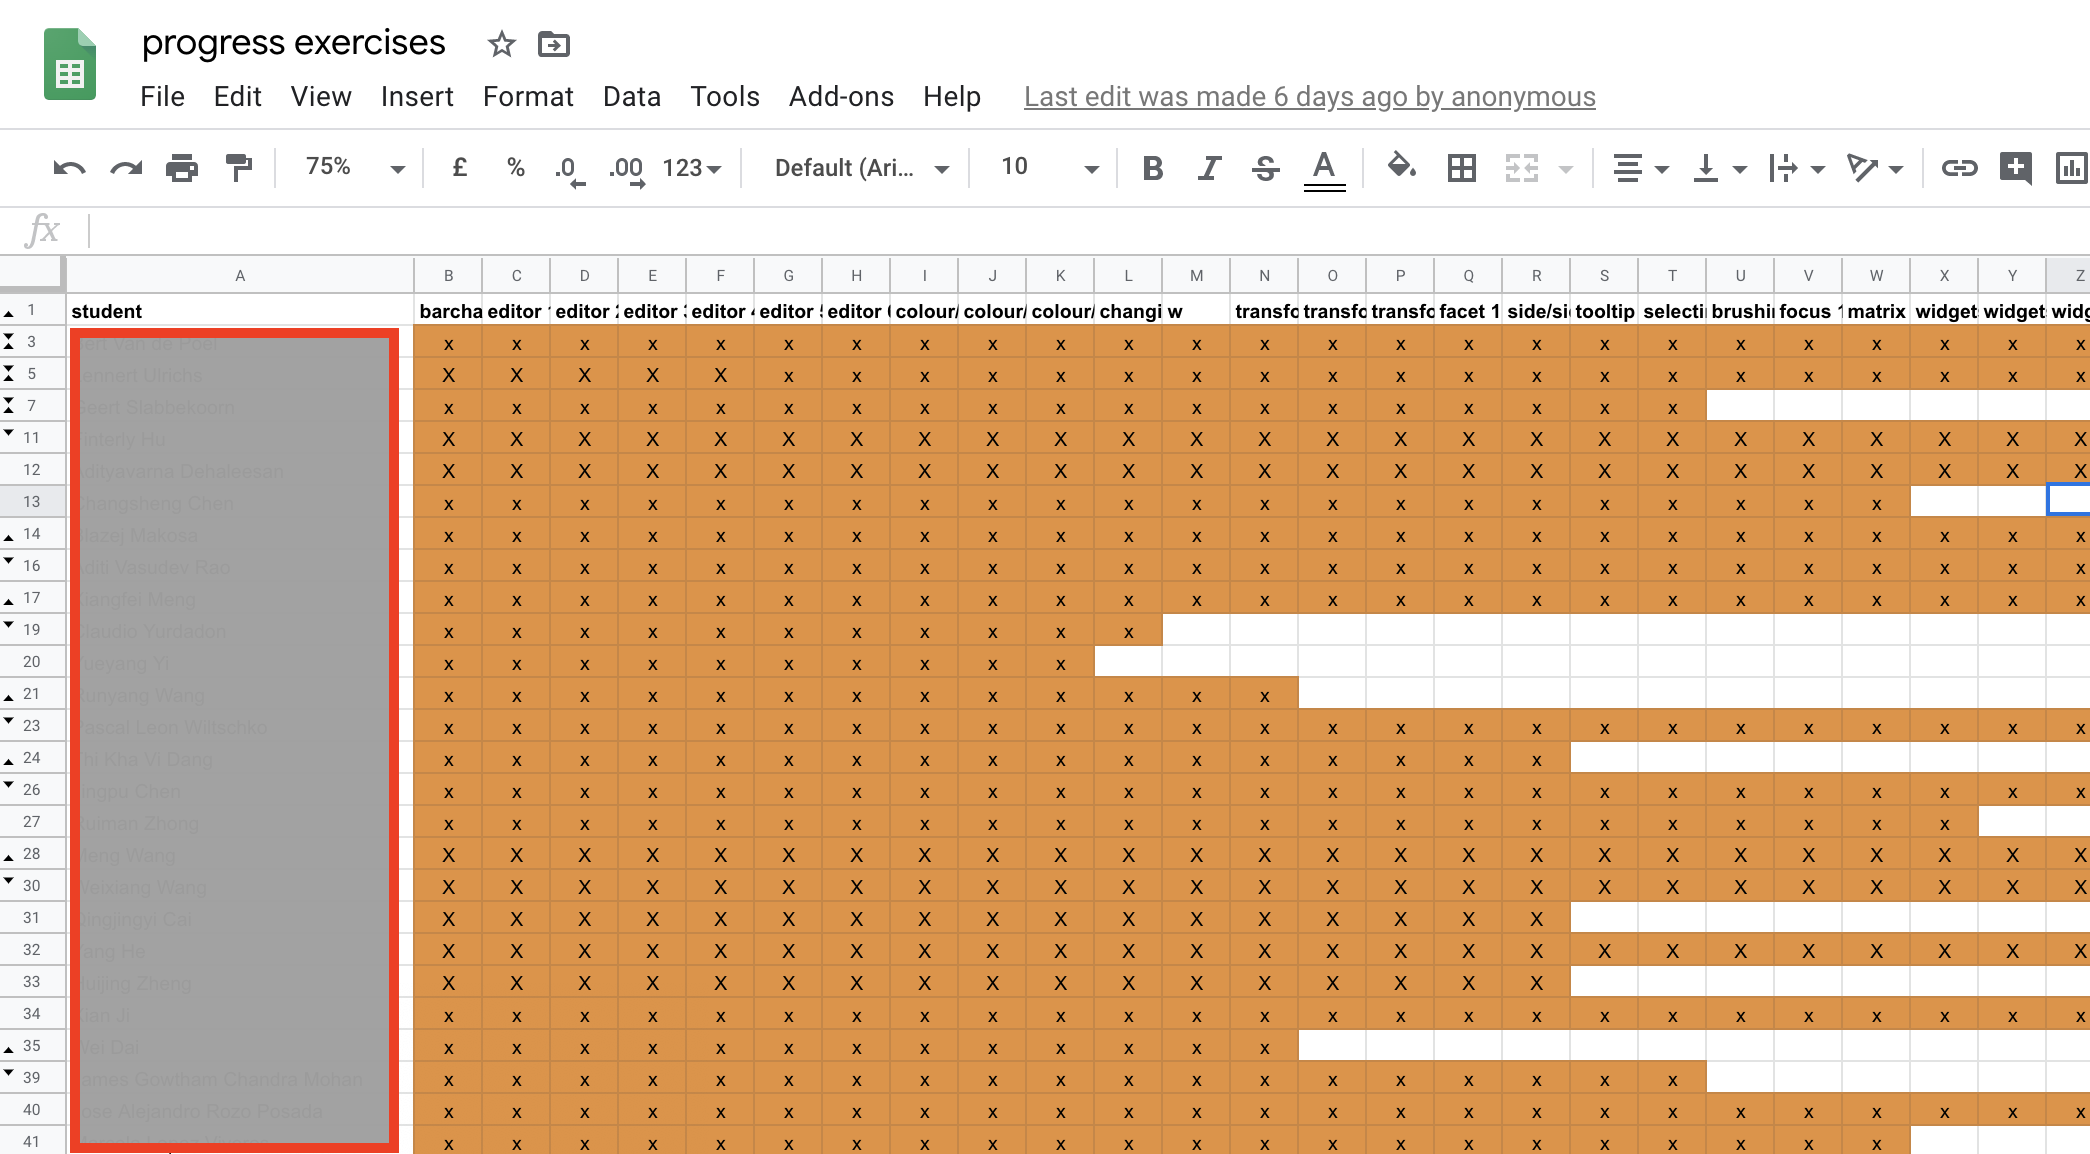
- a google sheet to track progress of all students across the exercises, and share it with all students. One row per student, one column per exercise. I set auto-formatting on all cells so that they get a background colour when something is put into the cell. As students are going through the exercises, they should indicate on the sheet when each specific exercise is completed. This makes it possible to identify who is lagging behind. Towards the end of the session, you hope the sheet will look like this:
Here’s the overview of what happens during a session:
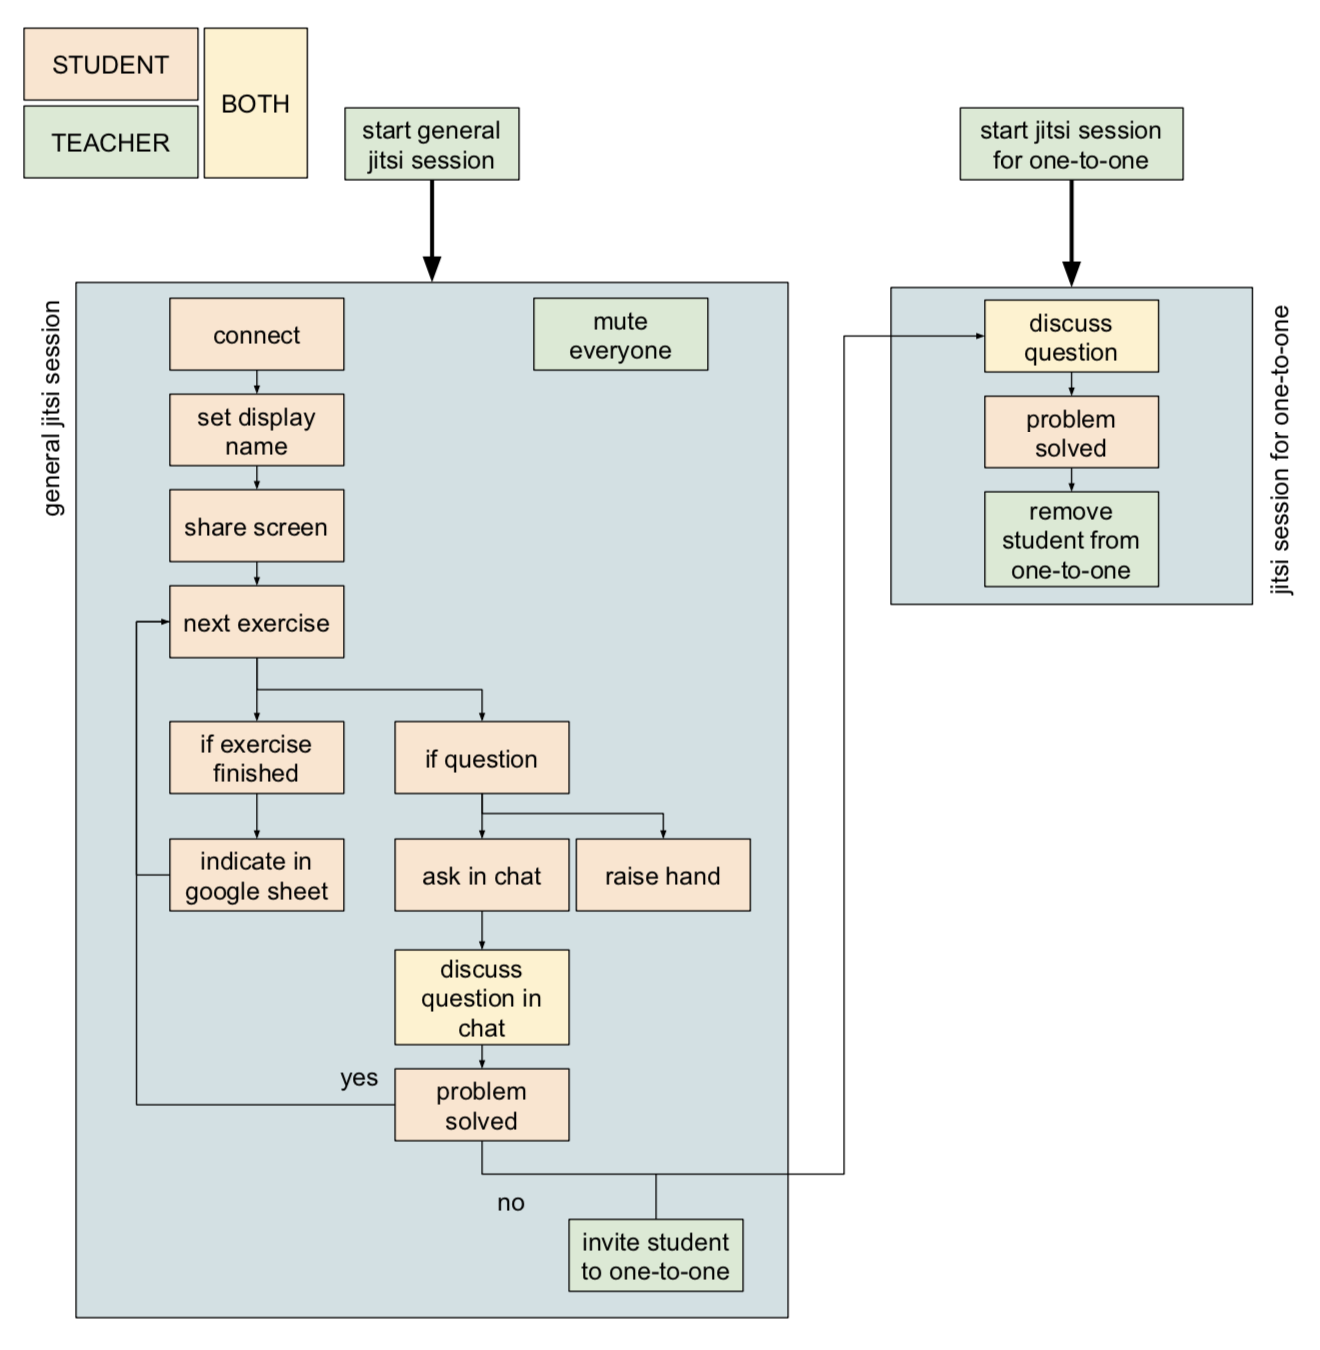
- The teacher starts a general jitsi meeting by sharing a URL with the students like this: https://meet.jit.si/FashionableRecruitsMobilizeHalf. To start yours, just go to http://meet.jit.si to get an automatically generated URL, or just append a quite-specific string to the main URL itself. A nice consequence of how it works, is that you can re-use the same URL for every session of a given course.
- Each member of the teaching team creates an additional separate jitsi meeting for one-on-one discussions with the students. Make sure to mute your sound in that one at first.
- I also connect with an ipad that will serve as my monitoring device for who raises their hand, etc. Sound and video switched off, and a headphone plugged into the ipad so that it’s silent as well.
- Each student connects to the meeting, and should:
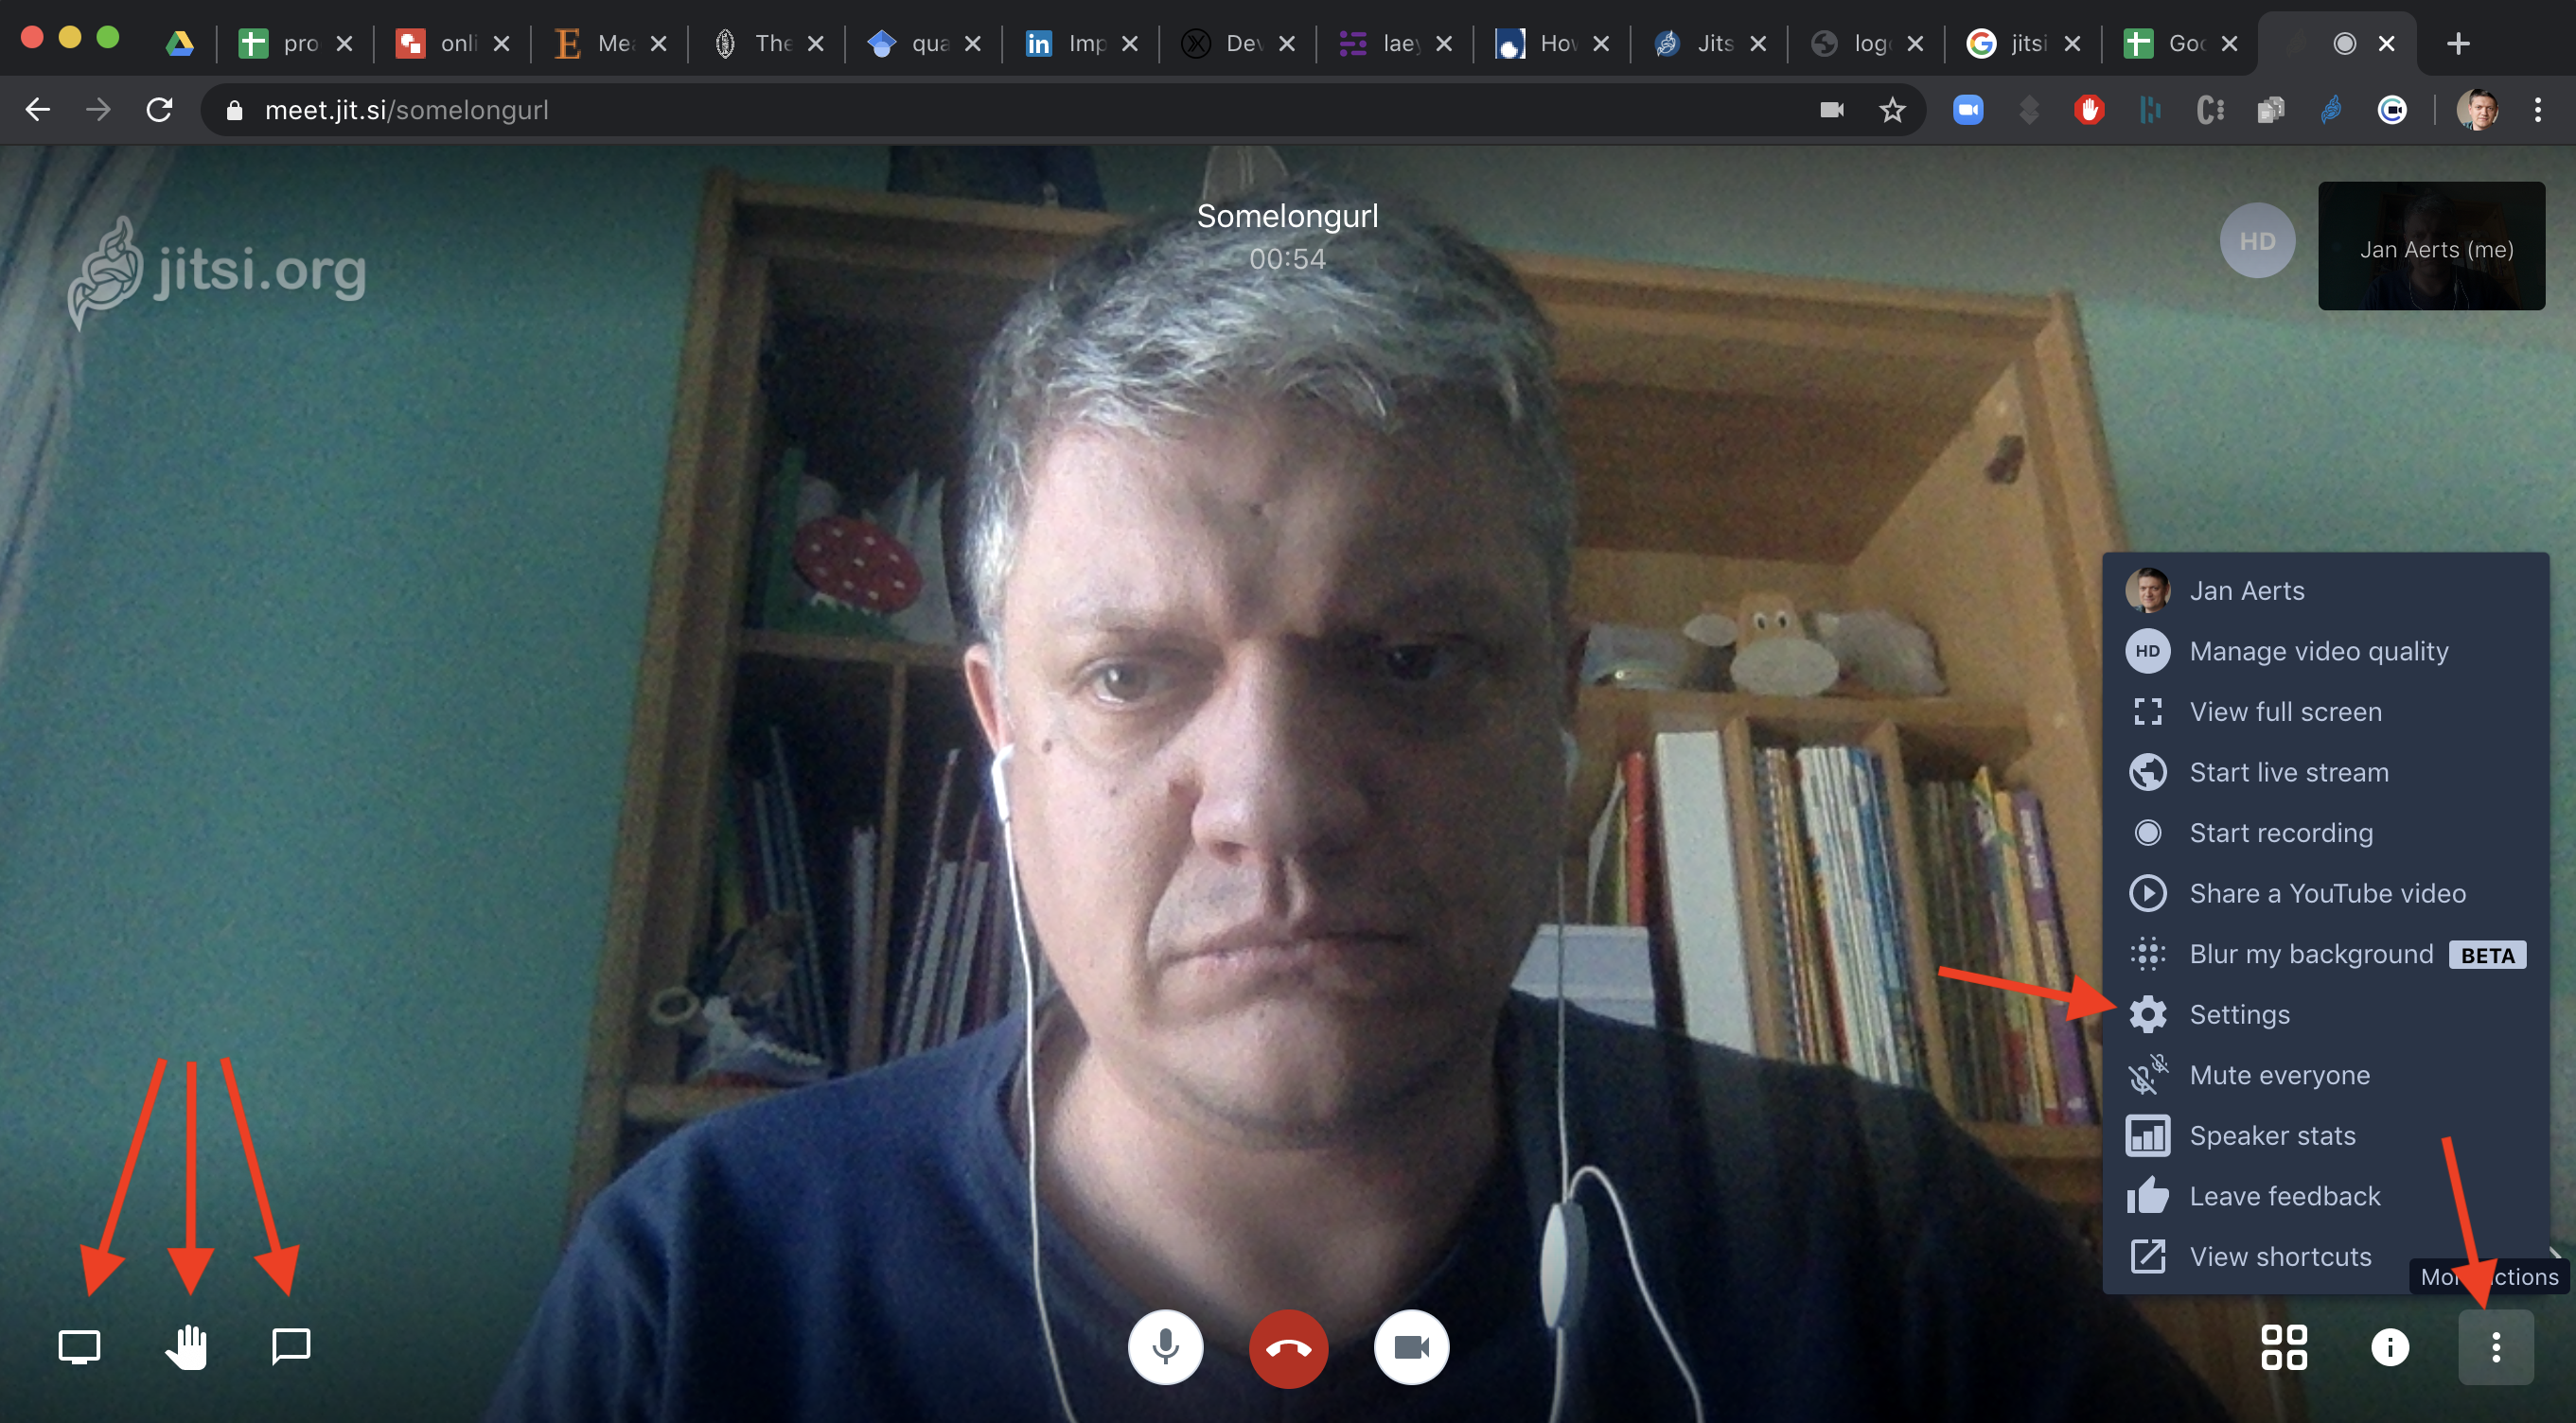
- set their display name (by clicking on the 3 dots in the bottom right, then on
Settings, andProfile; see the screenshot above) - share their screen (by clicking on the display icon in the bottom left)
- set their display name (by clicking on the 3 dots in the bottom right, then on
- The teacher mutes everyone, including the teaching team. Sound and video in the one-on-one meeting can now be enabled.
- Each student opens the google spreadsheet that we created above.
- Students start working on the exercises, and indicate in the google spreadsheet every time they finished an exercise.
- If the teaching team sees that a student lags a bit behind based on the google spreadsheet, they reach out to the student in the chat window.
- If a student has a question:
- they raise their hand using the hand icon in the bottom left, and
- they ask the question in the chat window
- if chat is not enough:
- the teacher invites the student to the separate one-on-one meeting room
- all issues are resolved and the student is able to work further
- the student leaves the one-on-one meeting room (or the teacher removes them)
- the teacher can continue monitoring the main meeting room
Checklist
Before the session
- Get myself a good internet connection…
- If necessary: create the Google sheet.
- Open the Google sheet
- Start a general jitsi session
- Start a separate jitsi session for one-to-one discussions
- Connect with the ipad to the general session. Plug in a headphone, mute and turn off its camera.
At the start of the session
- Welcome everyone
- Explain the ground rules:
- Add your first and last name to the profile. There are several ways of doing this. The easiest is to double-click on the little screen in the top right that represents you.
- Do not mute everyone. The teacher will do this if necessary.
- Do not kick other people out of a session. The teacher will do this if necessary.
- Do not record the session. This would be a grave violation of privacy.
- Mute everyone, including yourself. Use the spacebar instead if you want to talk.
- Explain the system, referring to this blog post:
- Ask everyone to share their screens
- Ask everyone to open the google sheet
- Explain that during the exercises they should ask their questions in the chat.
- Explain that they might get invited to a separate jit.si session for the one-on-one help.
- Once the students have started with the exercises, mute your own microphone. Any talking will happen in the separate jit.si session.
Lessons learned for the first session
This is what our first active session looked like with 38 people when everyone was sharing their screen:
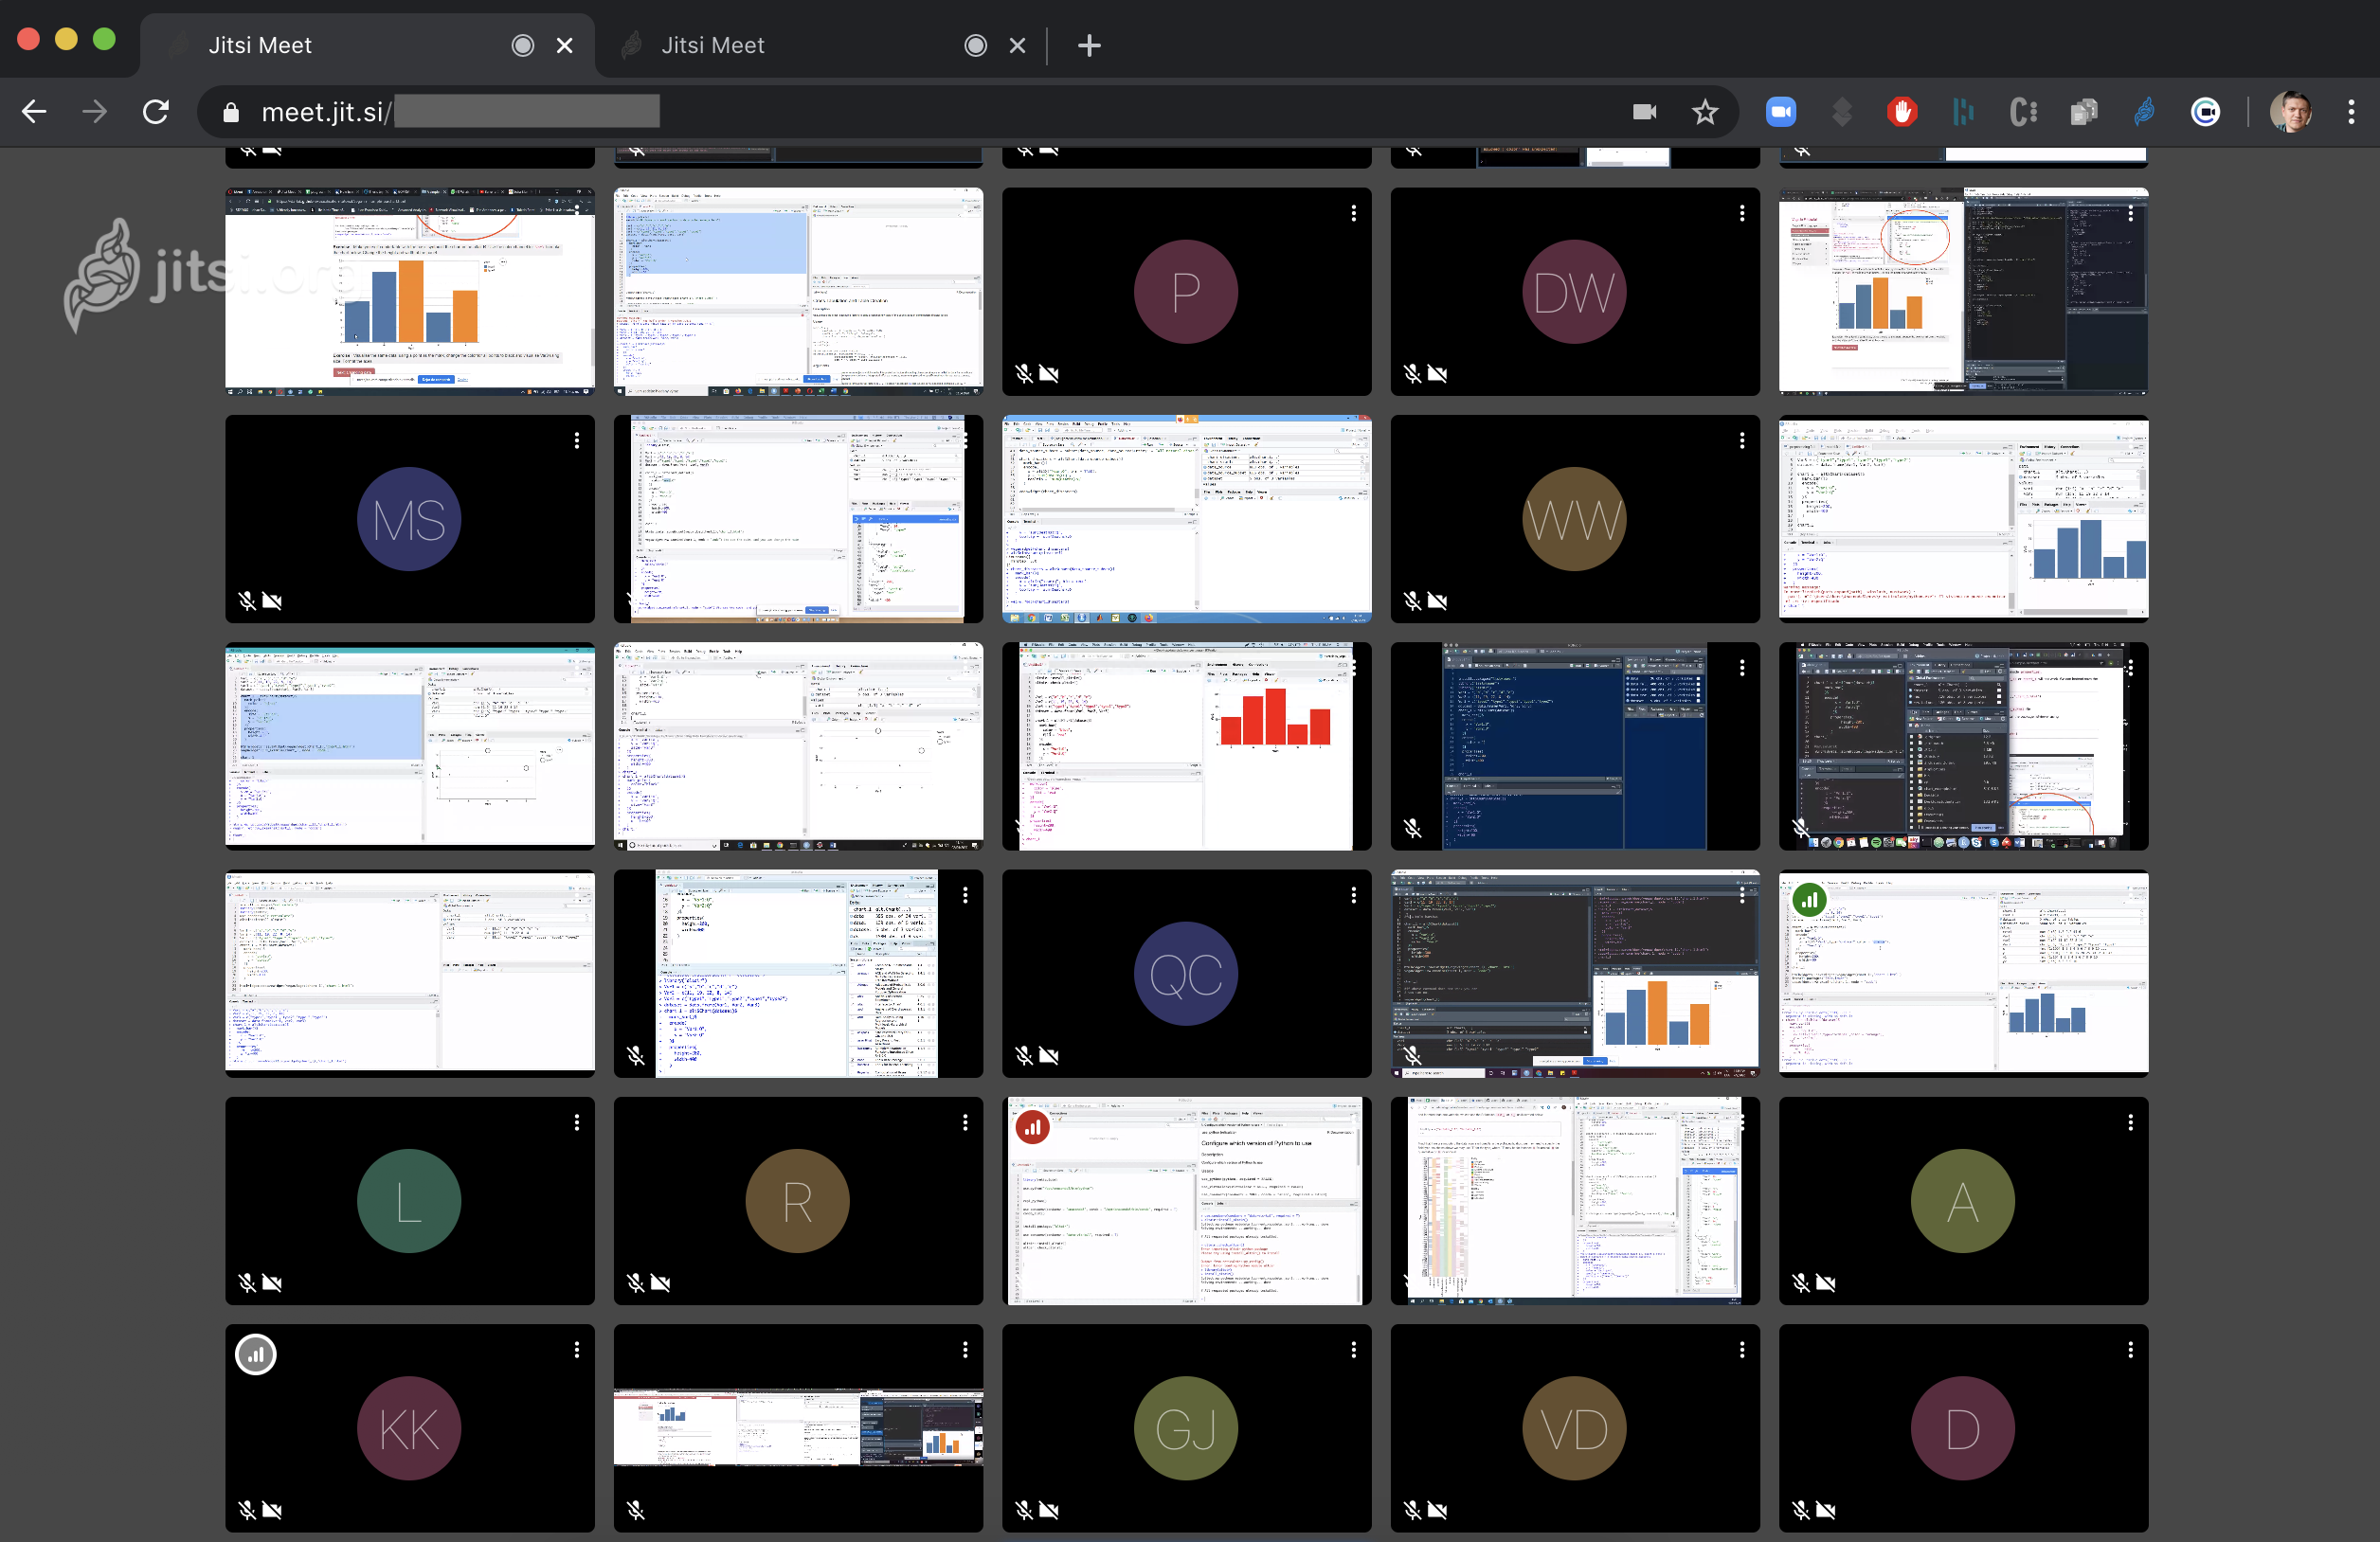
The 1.5hr session worked really well. We started the session with me explaining the best practices (aka the rules) above.
- Audio and video quality were quite good and didn’t pose any real issues. Can’t tell if they were better or worse than e.g. Zoom, but the difference was in any case not so big that I couldn’t tell without actually starting Zoom at the same time and comparing.
- In contrast to previous experiences in Zoom, Google Hangouts, etc, being able to see people’s screens gives us a lot of feedback on whether they are actually working on the exercises (or even still there). The fact that we can’t see exactly what they’re working on is not important; it’s the connectedness that counts more.
- The “raising your hand” if you have a question didn’t really work in the way that we expected, initially. As there were too many students, not all could fit on the screen at the same time. This meant that we had to constantly scroll up and down to search for students who had raised their hand. But… => That is now changed in the workflow above.
- The “raising your hand” can work in a different way. As questions were asked (and answered) in the quite active chat window, some of these questions would become hidden as they would disappear from the screen. Raising your hand didn’t work that well for catching our attention, but it was very good to make sure that you wouldn’t be forgotten.
- The private meetings with someone from the teaching team worked really well. If we couldn’t get something solved in the chat, we’d invite the student into a separate meeting.
- Some students sent private messages to the TA to ask if they could meet in the separate room. We will discourage this in future sessions, because it gets overwhelming quickly. Also: we want to choose who to follow up with, but looking at whose hand is raised as well as where each student is in the tutorial (i.e. looking at the spreadsheet).
- Little trick: when your microphone is muted, you can use the spacebar for a “push to talk”, like a walkie-talkie.
- There were students whose browser crashed when they wanted to share their screen. So be it: they didn’t share in the end.